Polar alignment makes stargazing much easier
The benefit of polar alignment can’t be understated, but it’s often made to sound far too complicated!
If you’re brand new to astronomy do follow the getting started with a new telescope guide first and take a look at my other beginner’s astronomy guides. If you have any issues, see the troubleshooting and frequently asked questions.
Polar alignment
This guide explains, in simple terms, how to polar align your equatorial mount as part of your stargazing routine. After that, you can follow targets across the sky using only the right ascension slow-motion control (or a motor drive/control). This is because an equatorial mount moves relative to a static point in the sky.
Teach someone to polar align and they’ll be gazing all night.
Nobody, ever – but they should.
What is polar alignment?
Polar alignment is the process of aligning your telescope’s “home position” to a stationary point in the sky. This point is the North Celestial Pole (NCP) in the Northern hemisphere. In the Southern hemisphere the South Celestial Pole (SCP) is used.
The telescope is aligned to this point by rotating the mount head and changing it’s latitude adjustment. Once aligned, the right ascension (RA) axis will rotate around this point. The declination (DEC) axis will move the scope towards or away from it.
Where is this stationary point?
The North Celestial Pole (NCP) is located close to Polaris, the North Star. It is easy to recognise as the brightest star in Ursa Minor – furthest from the four stars forming the body/square.
You may know the constellation Ursa Minor by the name “little dipper” or “little bear”. Polaris is usually one of the first stars you will see in the evening sky.
The South Celestial Pole (SCP) is close to Sigma Octantis. As this is not a particularly bright star, a planetarium app and binoculars may be helpful.
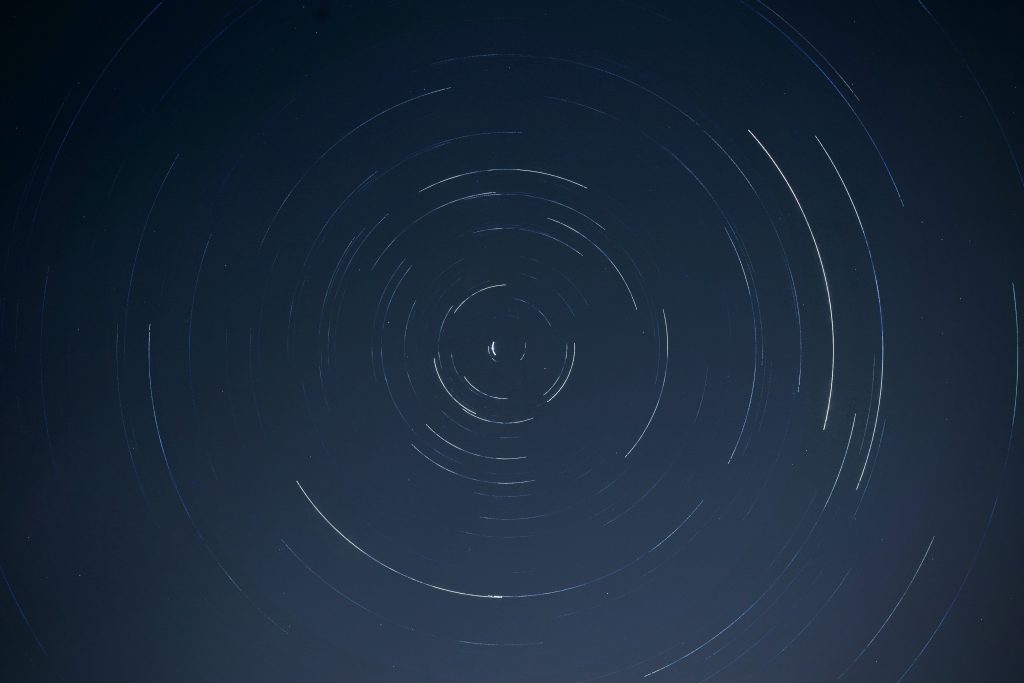
Think about star-trail photography
Artistic star-trail photography illustrates how this works perfectly.
The photographer doesn’t move, but instead captures the rotation of the stars around a static point in the sky.
To polar align we are simply aligning the telescope’s home position to this static point.
Polar alignment and telescope setup guide
Time needed: 10 minutes
Take the time to plan out your setup site and polar align to get the most enjoyment from stargazing. This guide makes it easy to polar align as part of your stargazing routine. Guide is based upon the Celestron Astromaster 130EQ, but the principals will apply to any telescope with an equatorial mount.
- Choose a suitable site for your telescope
First – you need stable ground and a clear view of your polar alignment point (Polaris/Sigma Octantis). You will also want a clear view of the wider night sky and any specific targets you have. See the getting started guide for more tips on choosing a suitable site.
- Get your bearings and position and orientate the stand
Next, carry the telescope to your chosen site. Determine where Polaris (or Sigma Octantis in the Southern Hemisphere) is in the sky and orientate the stand towards this.
Most mounts will feature an arrow, mark or even a polar alignment scope. This should point towards your alignment point (North in the northern hemisphere).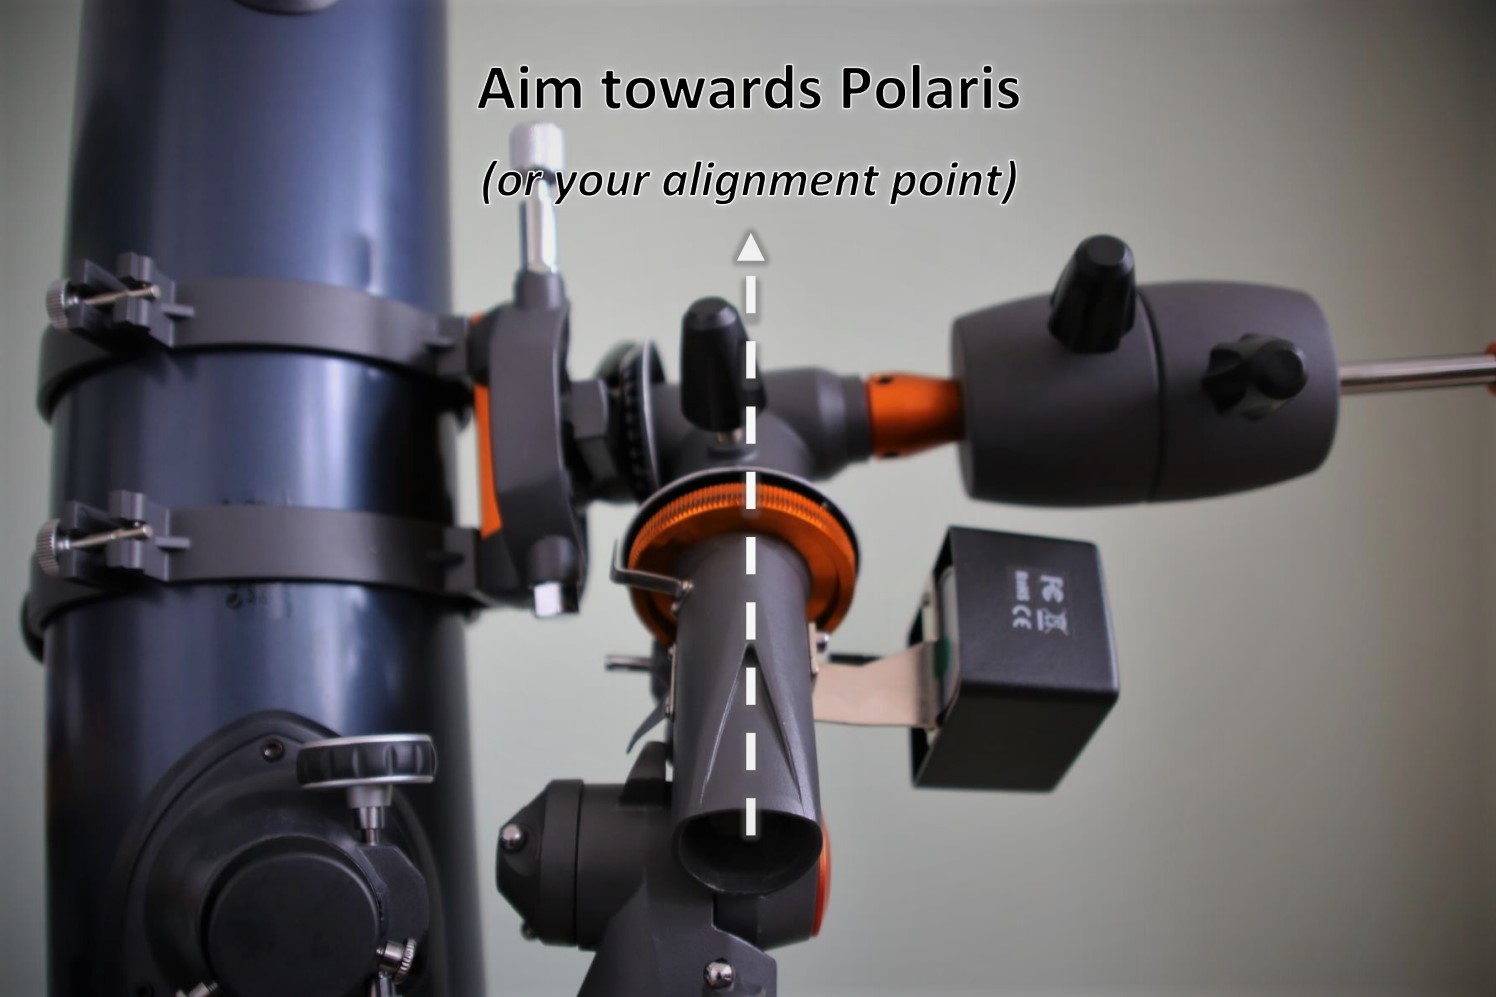
- Level and secure the stand
Now, setup the stand – ensure the legs are each pulled out fully (horizontally) and the accessory tray positioned centrally (if this is a structural part of your stand).
If your stand features telescopic (extendable) legs retract these to the lowest height to lower the centre of gravity and increase stability of the stand.
Carefully level the stand – a quick/cheap tip for this is to use a “plumbers line”. You can make your own – a coin/weight taped to a piece of string works just the same. Dangle this string over the accessory tray from the centre of the top of the stand. Then, adjust the legs until the line hangs centrally in the tray.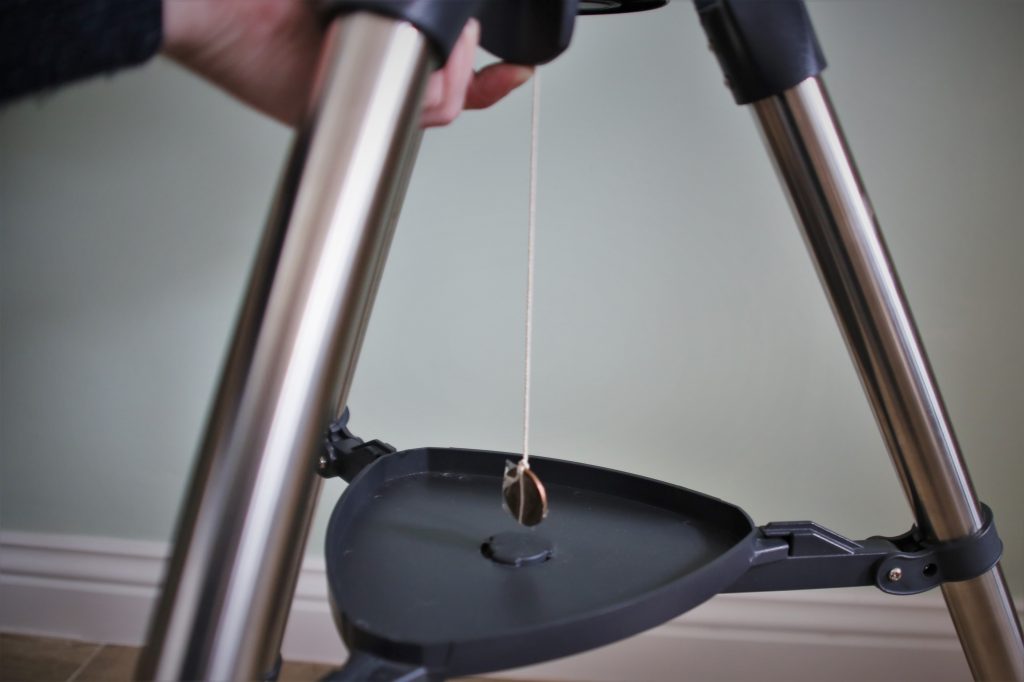
You can use a spirit level (or install one) on the head of the stand for more precise levelling.
If you have setup on soil/grass do push down on each leg so that it bites into the ground slightly as you continue to level the stand – this will stabilise the stand and cushion any movement.
Note: in the case of the AstroMaster 130EQ/CG-3 the tripod legs often hinge awkwardly with the mount head and the accessory tray can move, complicating matters. It’s worth removing the optical tube and the mount/declination head occasionally to re-level everything. Spend time ensuring the legs and head are orientated and accurately level. Place the mount on known, flat, area such as a tiled floor or level concrete with legs all fully retracted to do this. - Move telescope to home position
Then, unlock both axis and skew the scope until it is pointing up towards the sky.
First, move the DEC (declination) axis and move it until the “setting circle” reads 90 degrees, then secure it tightly with the locking knob.
The image below shows this setting circle set to 90 degrees. The declination (DEC) locking knob is shown below this and to the left.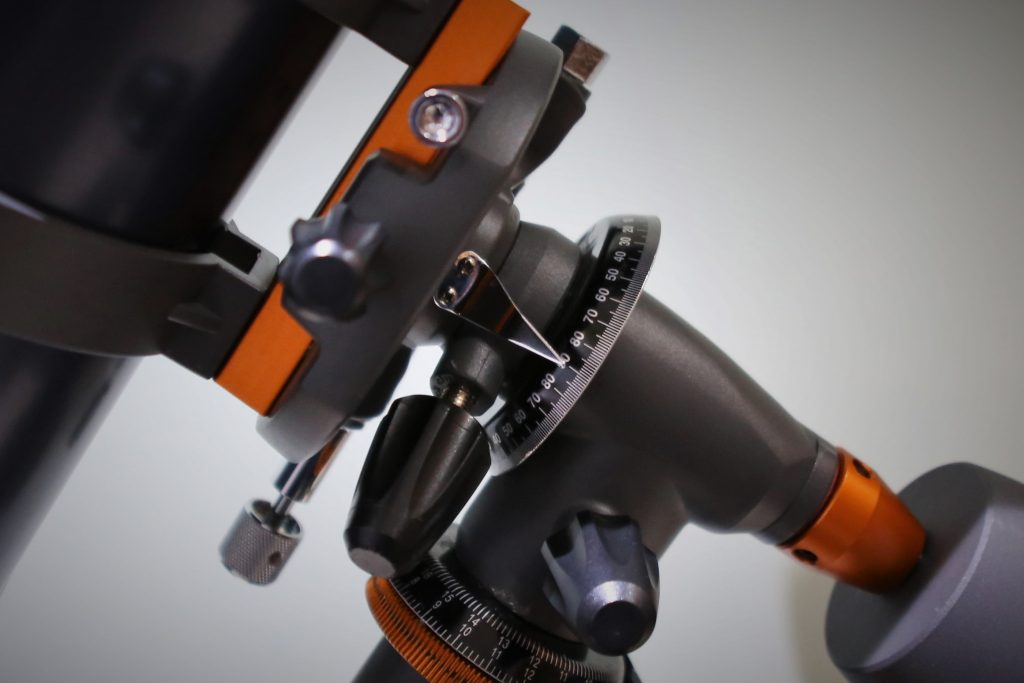
Finally, move the scope on the RA axis until the telescope is at it’s most upright position – the counterweight bar should also be at it’s lowest position. The right ascension (RA) locking knob is shown at the centre bottom of the above image.
In this “home position” your telescope should be pointing up nicely at the sky – and, assuming you orientated the stand roughly right, you’ll find that the scope is now already pointing in the general direction of Polaris or Sigma Octantis.
Image below shows the Celestron AstroMaster 130EQ in the home position.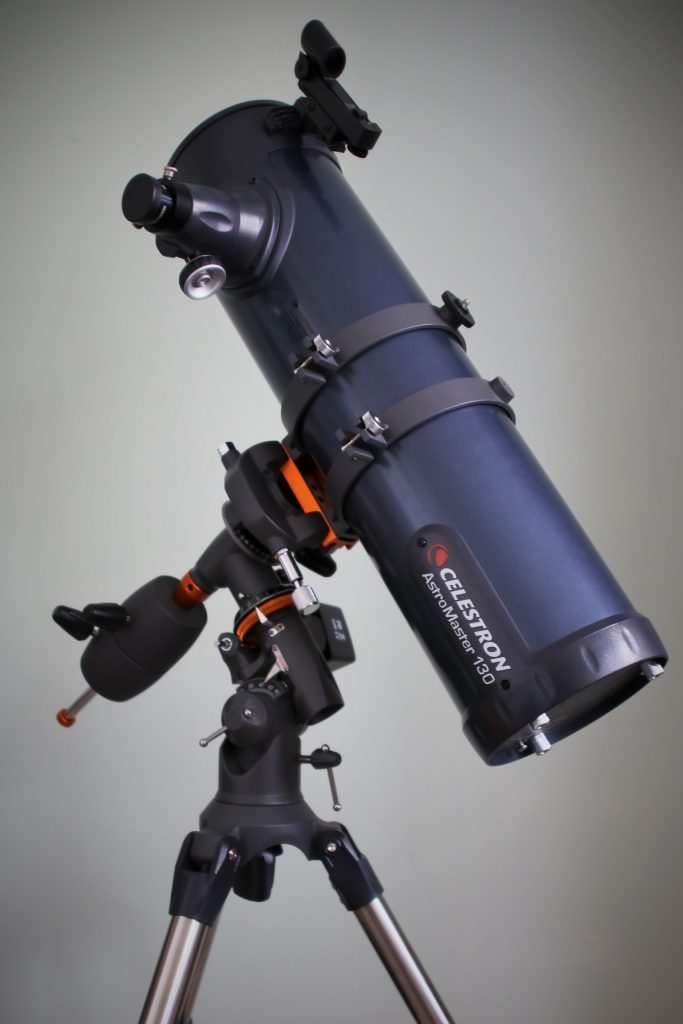
- Adjust the latitude and rotation of the mount head – using a polar alignment scope
If your mount features a polar alignment scope, use this together with an alignment app (to give you the accurate current rotation of Polaris).
Adjust the latitude and mount head rotation (as described in step 6 below) until Polaris is the correct location, as indicated by the app. - Adjust the latitude and rotation of the mount head – without a polar alignment scope
Now, using the finder scope, target Polaris (or Sigma Octantis) and move it into the centre of the eyepiece’s field of view.
Do not move the stand using either the DEC or RA axis until polar alignment is complete.
Loosen the latitude adjustment locking bolt, then adjust the latitude screw. This is shown on the left in the image below and the latitude adjustment screw is on the right: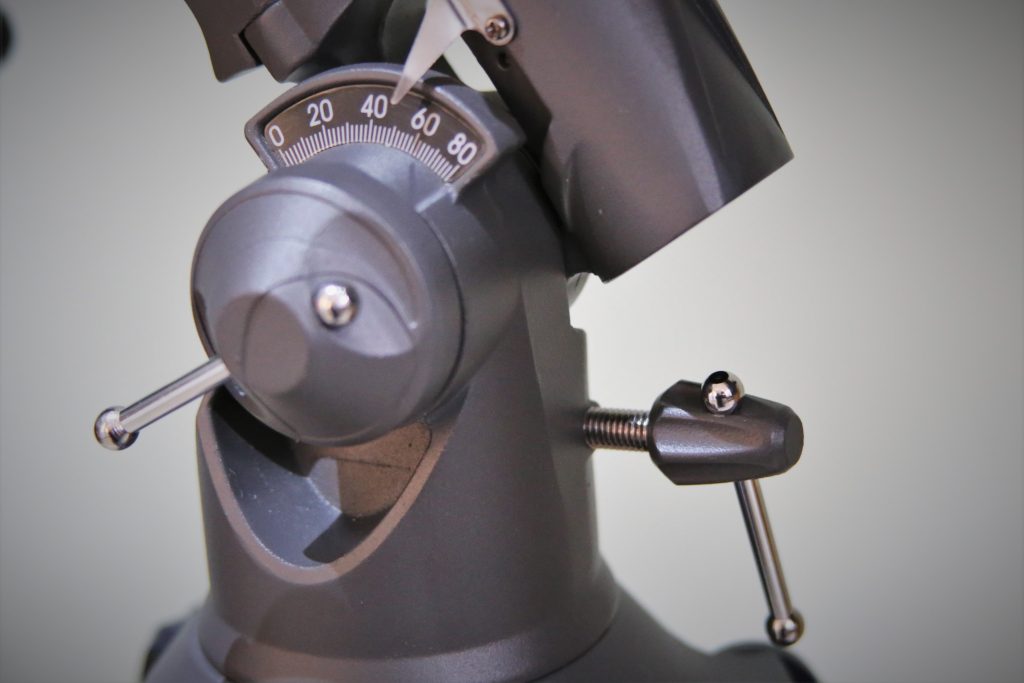
Next, loosen the base nut of the stand head slightly – just enough for you to be able to rotate the head of the stand. The base nut of the AstroMaster 130EQ/CG-3 stand is shown in the image below: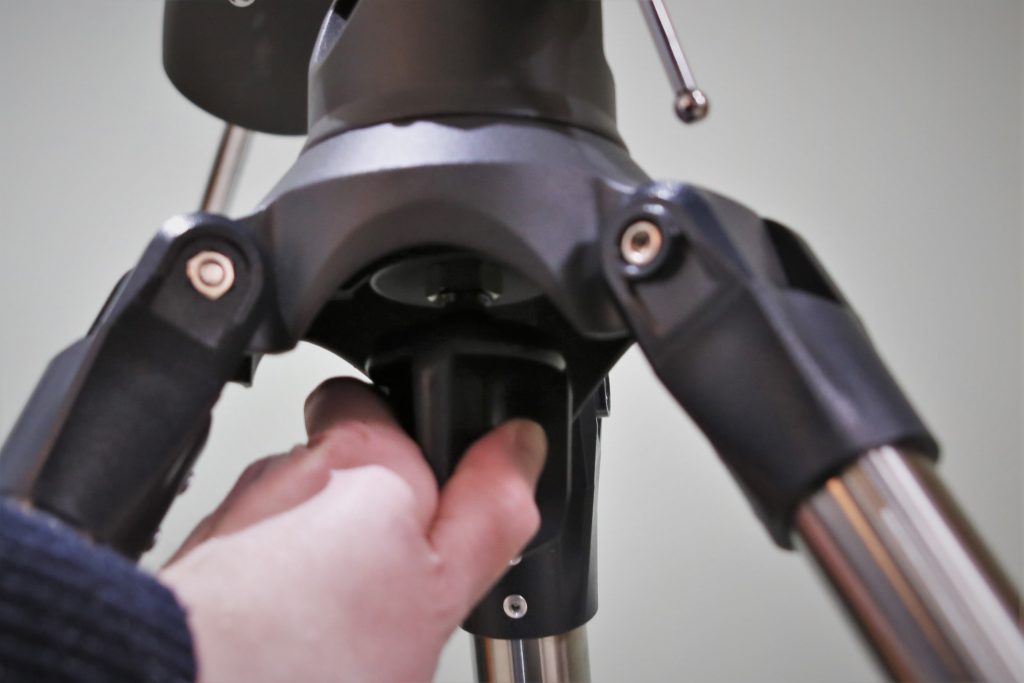
Raise or lower the telescope using the latitude adjustment and move it from side-to-side by rotating the mount head until you have Polaris targeted in the finder scope.
Once on target, switch to a low power eyepiece (e.g. 18-32mm) and look through the eyepiece. Continue to adjust until the star is perfectly central in the eyepiece. Progressively increase the power of your eyepiece and continue to centre the star in the eyepiece. I usually step up to a 6mm eyepiece for polar alignment. - Lock the latitude adjustment and mount head rotation
Once aligned, carefully tighten the mount head and the latitude adjustment lock.
On many stands, such as the AstroMaster 130EQ/CG-3, you will need to continue to make adjustments as you tighten these. Tightening the adjustments causes further movement – after some trial and error you will manage to securely tighten both with the target central. - Check and align your finder scope
Finally, there is never a better time to accurately align your finder scope – you have a clear target perfectly centred in the eyepiece.
Enjoy gazing with your polar aligned scope
Unlock the axis locking knobs and slew the scope to an interesting target. You’ll now find you can easily track it’s movement with only the right ascension axis slow motion control.
Please take a look at my other beginner’s astronomy guides, follow my journey or join me on twitter.