Combining lots of images or video can obtain more detail from your target – a major part of lunar processing.
This absolute beginner’s guide will get you started on your astrophotography journey – stacking and processing your images. Sample data is included – so you can follow and compare like-for-like with the walkthrough.
Processing is a complex area with a range of imaging, software and processing options. To keep things simple and get you started quick, this guide focuses on a simple workflow.
If you’re new to astronomy, please see if my other beginner’s astronomy guides can be of assistance.
Sample data
This sample video is provided as a sample to use with this guide – allowing you to follow the steps like-for-like.
(Right-click the link and select “Save Target/Link”)
It’s a typical capture from a beginner telescope and camera. In this case the footage was captured using a DSLR camera attached to the Celestron AstroMaster 130EQ-MD on the CG-3 stand.
The video had to be compressed considerably in order to host/provide it to you. However, it demonstrates that even with a relatively low-quality capture you can achieve quite striking results with your processing.
If you have already captured your own footage simply use this instead as you follow the guide.
Lunar astrophotography processing guide
Time needed: 1 hour
To follow this guide you will need three free software packages:
– First, Planetary Imaging Pre-Processor (PIPP) will first stabilise and crop the images.
– Next, Autostakkert 3 will stack these to produce a single image with greater detail.
– Finally, Registax 6 will be used to process and sharpen the final image.
Install each of these before you begin, then follow steps below:
- PIPP – Load your images or footage into PIPP
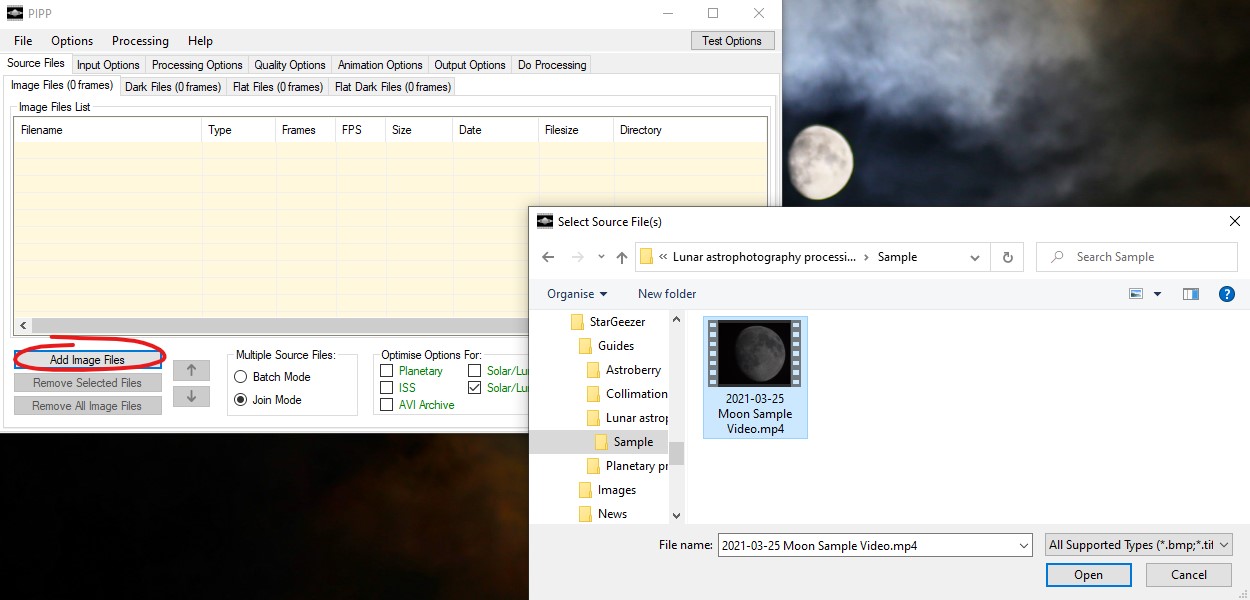
First, open up Planetary Imaging Pre-Processor (PIPP) and load your video or individual photos. You can drag and drop items into the PIPP window or select them by clicking the “Add Image Files” link in the bottom-left corner.
- PIPP – Select optimise for “Solar/Lunar Full Disc”
Next, set the mode for your capture in the bottom right of the PIPP window under “Optimise Options For:”. The mode depends on the type of target and how you have framed it in the image:
– “Planetary”, where you have a target such as Saturn, Jupiter or Mars as a disc within the image.
– “Solar/Lunar Close-up”, for close-up surface shots that fill the whole image.
– “Solar/Lunar Full Disc”, for moon images where the whole moon fits within the image frame.
For the sample Moon data provided above select “Solar/Lunar Full Disc” lunar processing mode.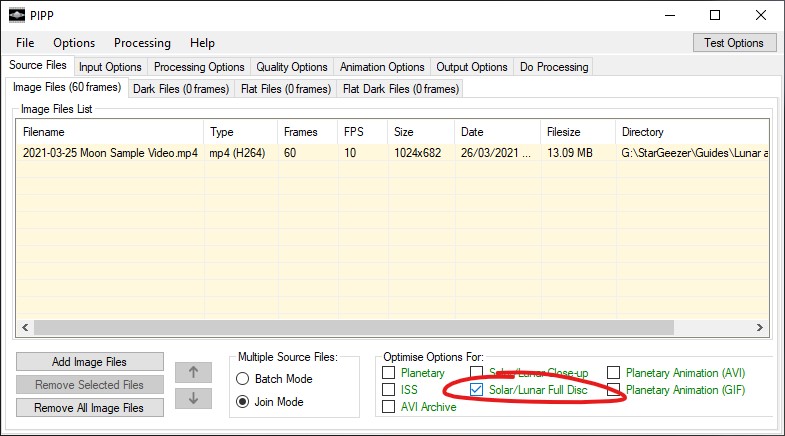
- PIPP – Settings – “Processing Options” tab
Now, click on the “Processing Options” tab.
Untick the “Convert colour to monochrome” option to retain any colour in the image.
Under “Cropping” you can change the width and height of the output file. For example if you wish to produce a particular aspect ratio such as 4:3 or 3:2. For instance, I typically match my camera’s original 3:2 aspect ratio – so would calculate the width from the height: (1200/2 = 600, times 3 = 1800 width). Note that the crop settings do not resize the image – only the crop applied to it.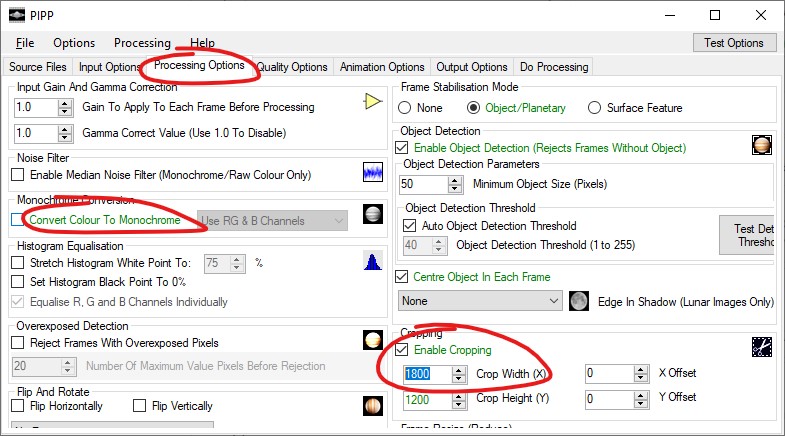
- PIPP – Settings – “Output Options” tab
Then, click on the “Output Options” tab.
Set the Output Format to “AVI” – this will output a stabilised and cropped AVI video of the original frames.
You can change where the file is saved (by default it creates a “pipp_” sub-folder in the original video location).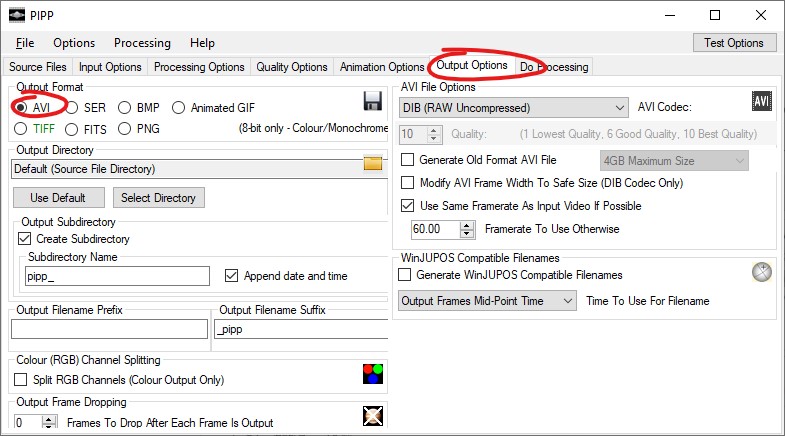
- PIPP – Process the video – “Do Processing” tab
Do review the other tabs as well – so that you get a feel for the settings. However, for our sample video we have set all the options and can now process the video.
Finally, go to the “Do Processing” tab and click “Start Processing” to get started with our lunar processing.
PIPP will now process the capture – stabilising and cropping the target in frame.
PIPP will create a subfolder with the name “pipp_[current_date]” in the folder where you saved the moon sample video.
Watch the video – you’ll see that the object no longer moves around the frame.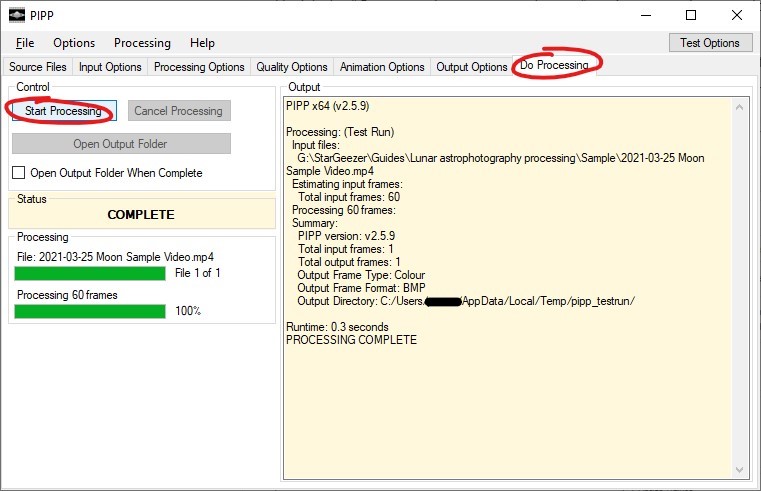
- AutoStakkert – Load video into AutoStakkert
Now you can open up Autostakkert 3.
You can drag and drop the video onto the AutoStakkert window. Alternatively select your file by clicking the “1) Open” button and navigating to the location on your computer.
Once the video has loaded, a preview of the images/video appears in the AutoStakkert “Frame View” window.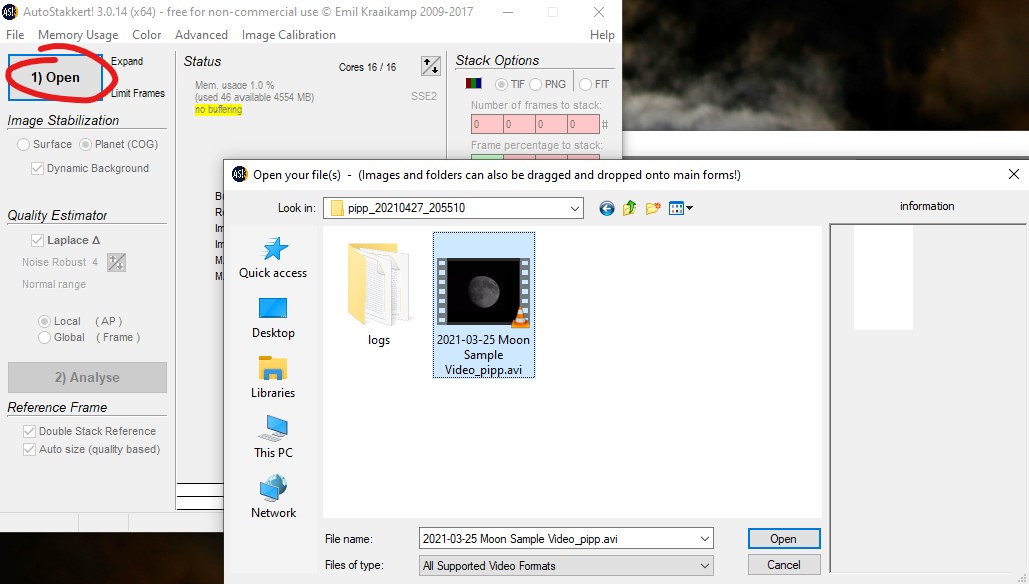
- AutoStakkert – Select a clear frame
Next, go to the AutoStakkert “Frame View” window. Then, drag the slider at the top left and right to view the individual frames that make up the video.
You will notice that PIPP (by default) has re-ordered the frames so that the clearest and brightest frames appear first. The video gets dimmer and of lower quality towards the end.
Find a good frame to use as a reference:
If your target has clear surface features, e.g. the Moon, then select one with clear features across the whole surface.
For distant targets with limited surface features, e.g. Jupiter, Venus, select a frame with a good spherical planetary disc. If you can find a frame with both a spherical disc and surface detail this would be ideal.
For the sample data, simply use the first frame.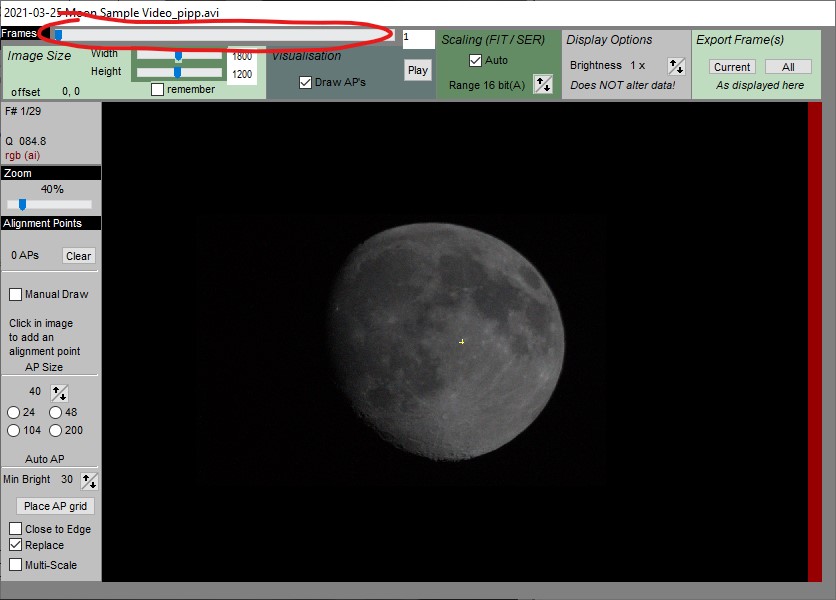
- AutoStakkert – Place Alignment Points (AP)
Once you’ve selected a good frame, select a suitable AP size and then hit “Place AP grid” from the bottom left of the preview window.
AP size will vary depending upon the size of the target/field of view. For the sample video use 48, but do experiment with different settings to get a feel and review the resulting stacked images.
AutoStakkert will place alignment points across the detected surface. During stacking it will use these alignment points to compare and recombine all of the frames into a single stacked image.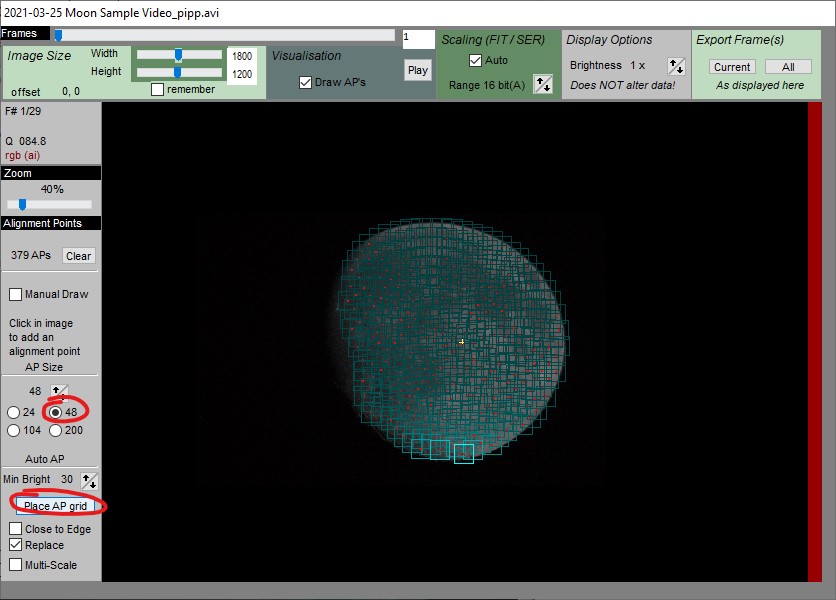
- AutoStakkert – Analyse video
Next, click “2) Analyse” in the main AutoStakkert window. AutoStakkert will then analyse each frame of the video. It analyses sharpness, brightness and compares each frame to order them in quality and difference.
Once complete, a chart will appear in the central section of the main AutoStakkert window. The horizontal x-axis represents the frames in the video. The vertical y-axis represents the quality of each frame, as determined by AutoStakkert’s analysis.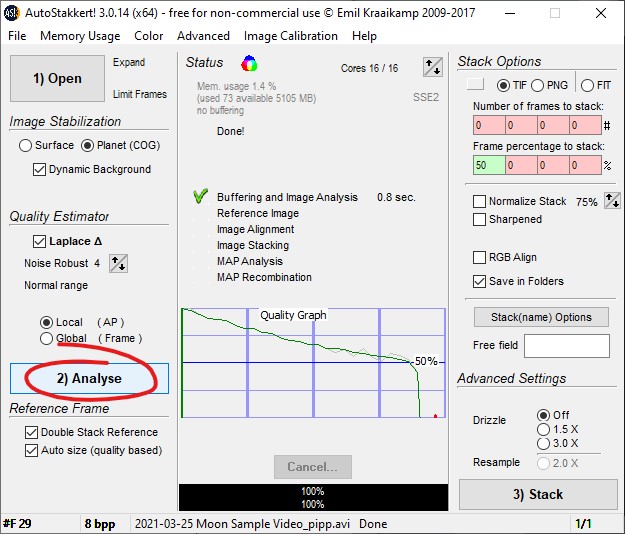
- AutoStakkert – Set Quality/Frames to stack
At this point, you can click along the quality graph to see each frame in the preview window. You may wish to deselect “Draw AP’s” at the top of the preview window so you can see the image more clearly.
Determine where you feel the quality becomes unacceptable – or degrades significantly from the best ones you have. If you have relatively consistent frames – with good seeing throughout you can set this to a higher value. If your footage is generally poor with only occasional good frames you will want to set this lower. This is so that only the sharper images are used to produce the stacked image.
Hold CTRL while clicking on the chart to change the “Frame percentage to stack” setting. You can also manually set this to a specific % value by entering a value in the bottom left field under “Stack Options” in the top right of the AutoStakkert window.
For the lunar processing sample video hold CTRL and click around halfway across the chart or enter 52 into the frame percentage field (52 simply as there are an odd number of frames).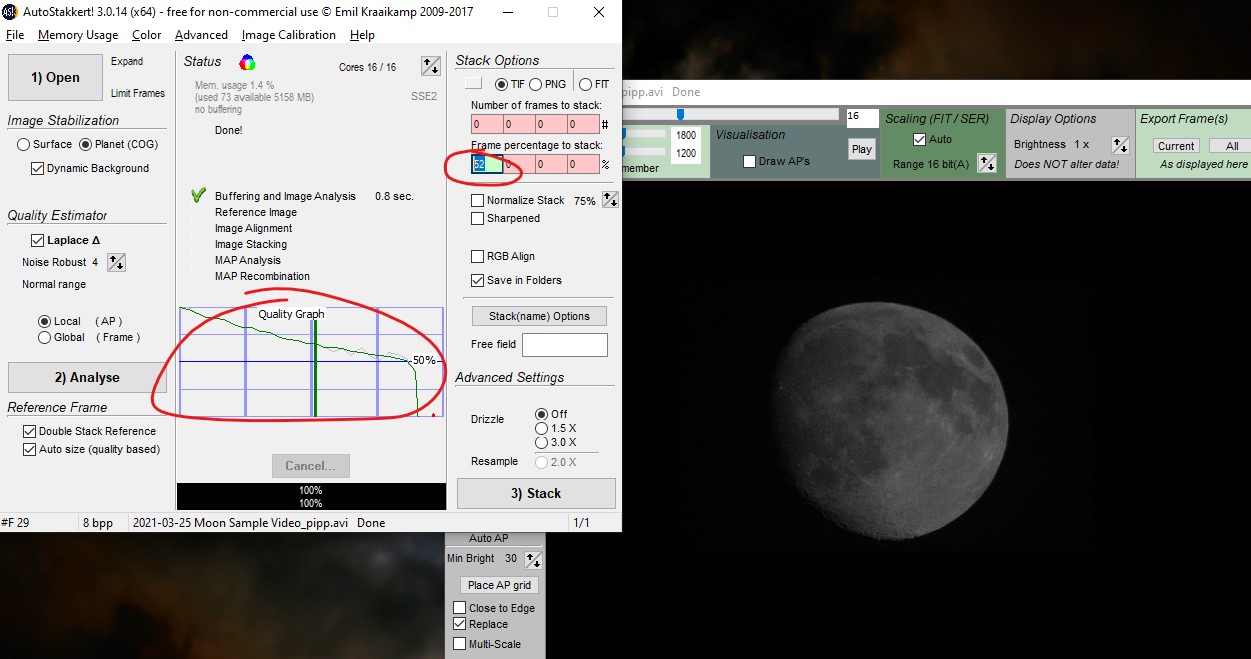
- Stack the image with AutoStakkert
I usually select “Double Stack Reference” under Reference Frame in the main AutoStakkert window. The resulting file will be saved alongside the original video in a subfolder named “AP_Pxx” (xx being the quality % selected).
Then, all you need to do is hit “3) Stack”. AutoStakkert will process the frames, using the alignment points to align, combine and stack all of the frames into a single clearer image.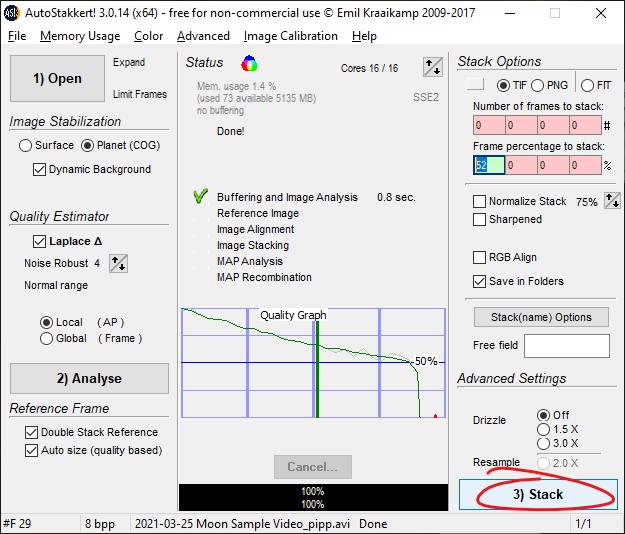
The image will be saved into a sub-folder named “AS_Pxx” (where xx is the frame percentage set to stack). If you’re happy with the resulting image, open up Registax 6 and move onto the next step. Your resulting image should look something like below.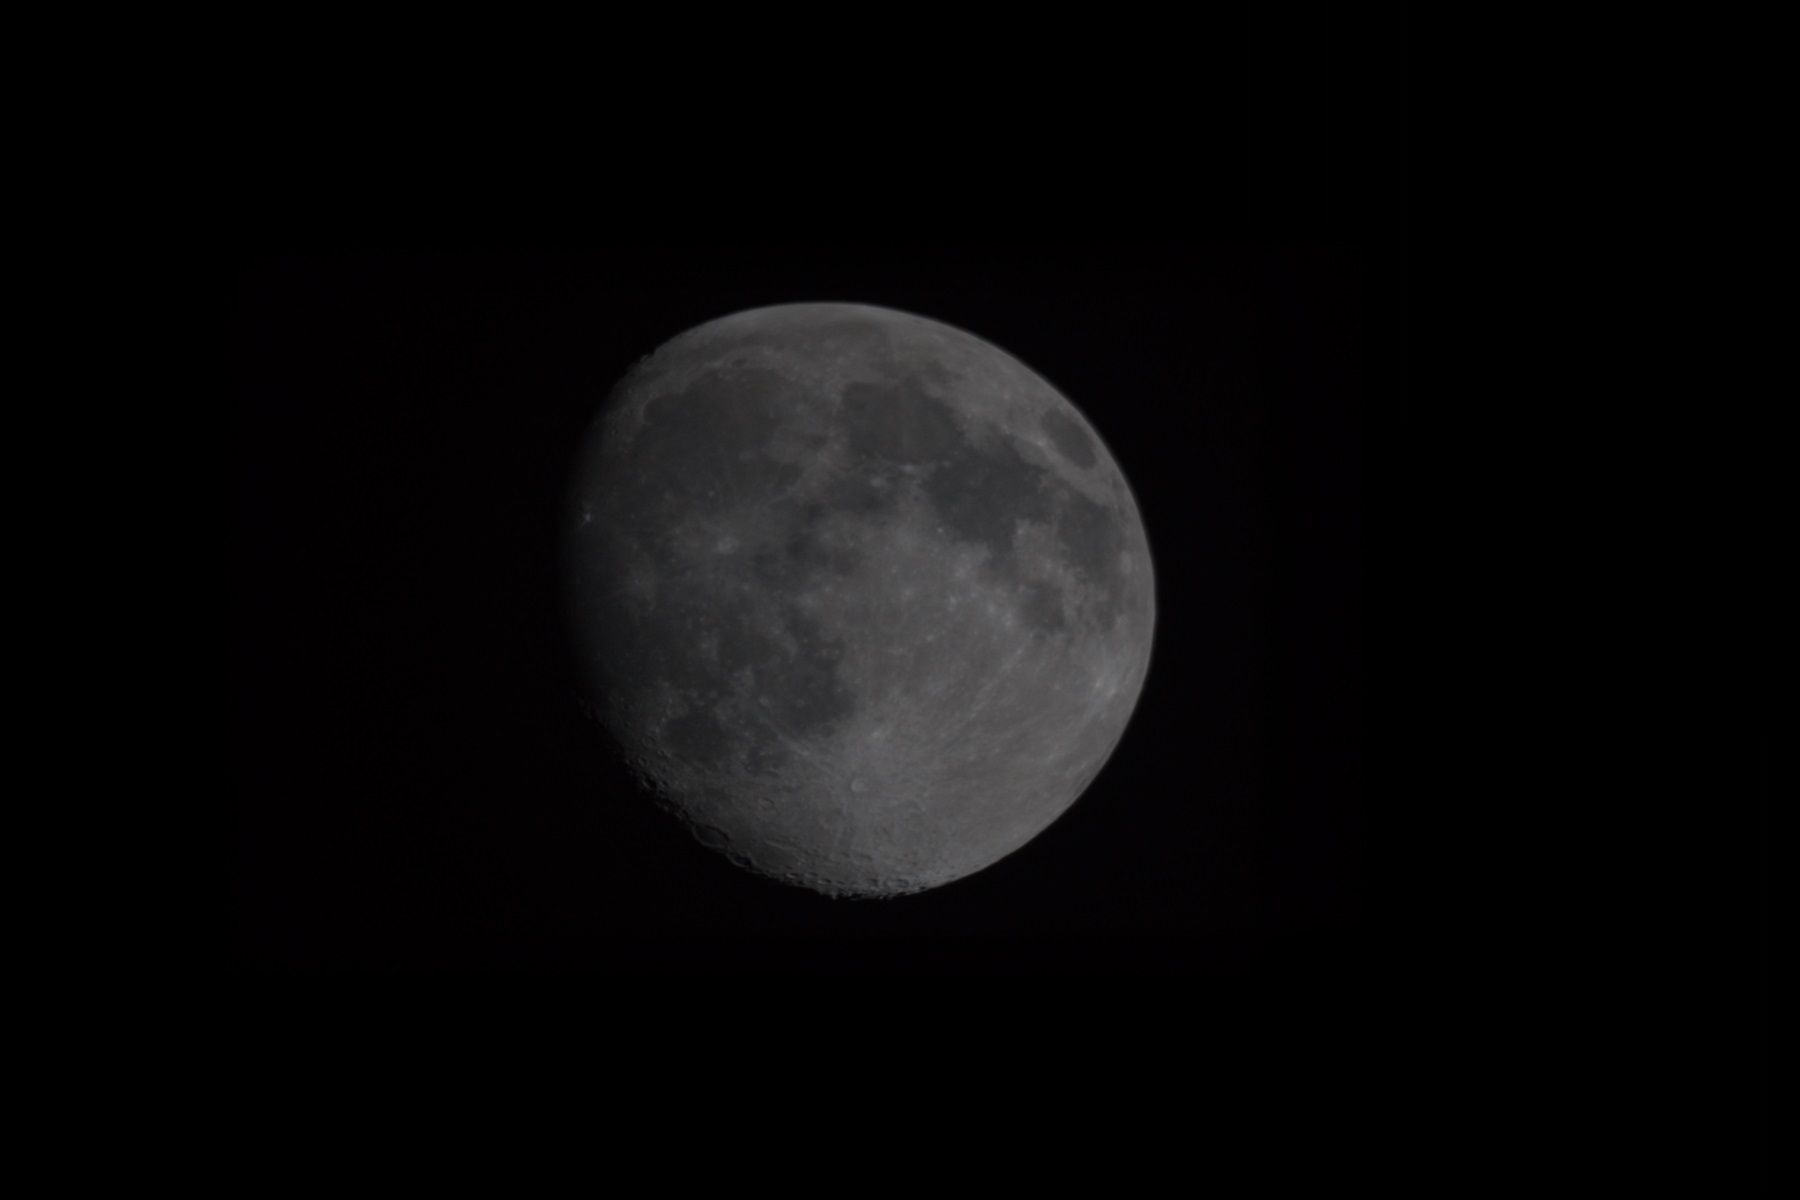
- Open Registax 6 and open the stacked image
The next steps of our lunar processing workflow are in Registax.
Load up Registax 6, then click “Select” in the top left corner. Navigate to and select the stacked image that was saved by AutoStakkert.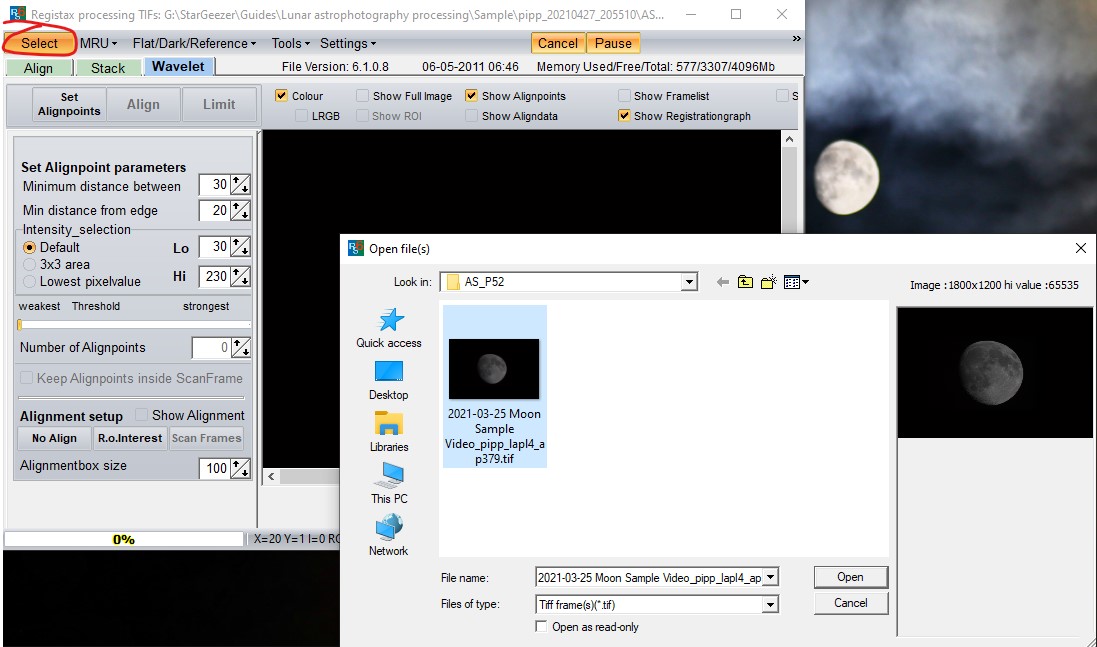
If prompted by a dialogue to “Stretch intensity-levels” click “Yes”.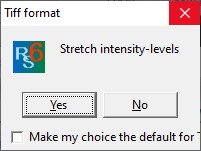
- Open “Histogram” tool
Click the “Histogram” button from the panel on the right of the window.
This will open the “Histogram_Panel”.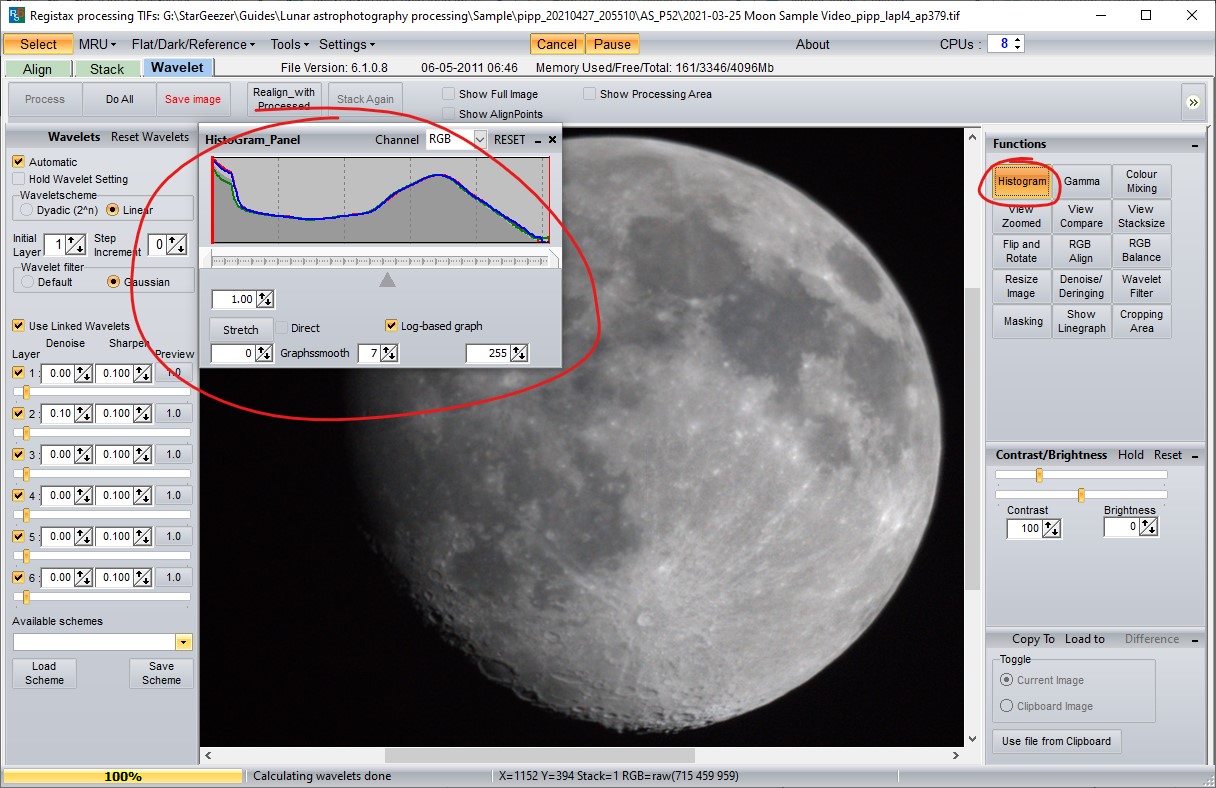
- Adjust the histogram in Registax
Move the grey arrow – the histogram mid-point – to achieve the best contrast for the image. The changes are displayed in a square area of the image – the processing area.
Click around the image to move the processing area and review how the changes look across the image.
- “Stretch the histogram” in Registax
In the case of the sample data we do not need to do this – this is for information only.
In higher quality video, other camera settings and, usually fainter, targets – there will often be large amounts of data that can be clipped from the histogram. This is often necessary to bring out detail in the surface of planets or reveal faint details in deep sky objects.
Where necessary, click “Log-based graph” so that the histogram chart shows the full spread of the image data. Then drag the two end sliders (below the chart) inwards so that they remain either side of the start and end of the data (where the chart rises above the bottom axis). These two points are where we will clip and “stretch” the remaining data contained within the image. So, we want to avoid removing any data that is present.
Click “Stretch”. You should immediately notice a difference in the contrast and detail across the lunar surface within the processing area. Adjust the mid-point again and continue to re-stretch and adjust the mid-point to achieve the best result.
Remember to click different areas of the image to move the processing area and preview the results in different areas of the image.
Don’t worry – if you ever mess-up you can simply hit the “RESET” button in the histogram tool to revert to the original image. - Apply wavelets to sharpen the image
The exciting part of lunar processing – wavelets use computer algorithms and techniques to bring out additional detail from images. Remember to move the processing area to review the result as you make these adjustments.
I usually select “Use Linked Wavelets” and then slowly make adjustments to the six wavelet sliders on the left side of the Registax window. Only very slight adjustments can have a big effect on the image – so take it very slowly. I typically find that a gradual increase in layers 1 – 2, then tailing back down in the remaining layers achieves good results.
Every image is different – the best way to get the best wavelets setting is trial and error for each image you process. For common targets/telescope/camera settings you can save your wavelet settings to re-use by clicking the “Save Scheme” button. Also experiment with the “Denoise” values (if a layer introduces noise/grains this can sometimes help) as well as “Sharpen” which makes the layer much more aggressive.
The screen capture below shows wavelets applied to the processing area toward the bottom of the moon. You can see only very gentle levels have been applied. Layer 1: 3.00, 2: 2.00, 3: 1.6, 4: 1.5, 5: 0.5, 6: 1.1.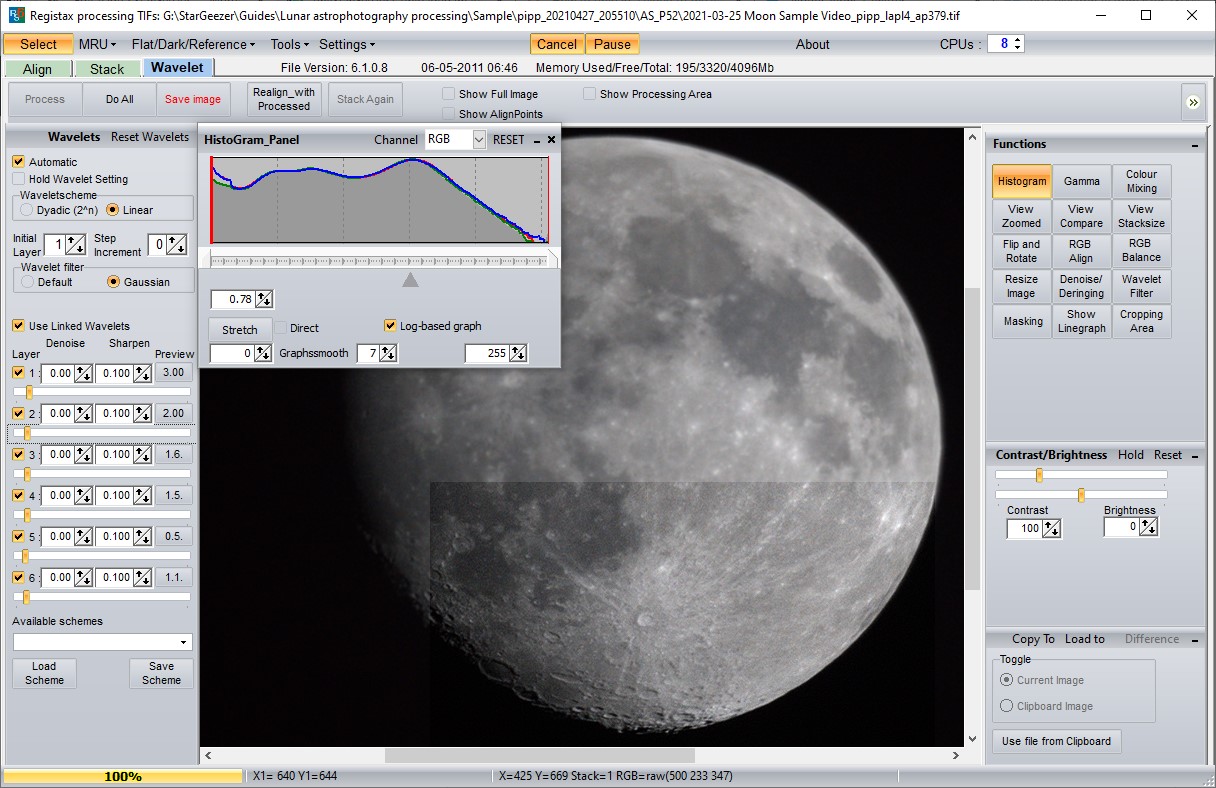
- Complete the processing – “Do All” in Registax
Once you’re happy with the resulting image, simply click “Do All” to complete the processing.
At this stage you’ll often notice something you’d like to tweak slightly more – simply make the changes and you can just “Do All” again once happy.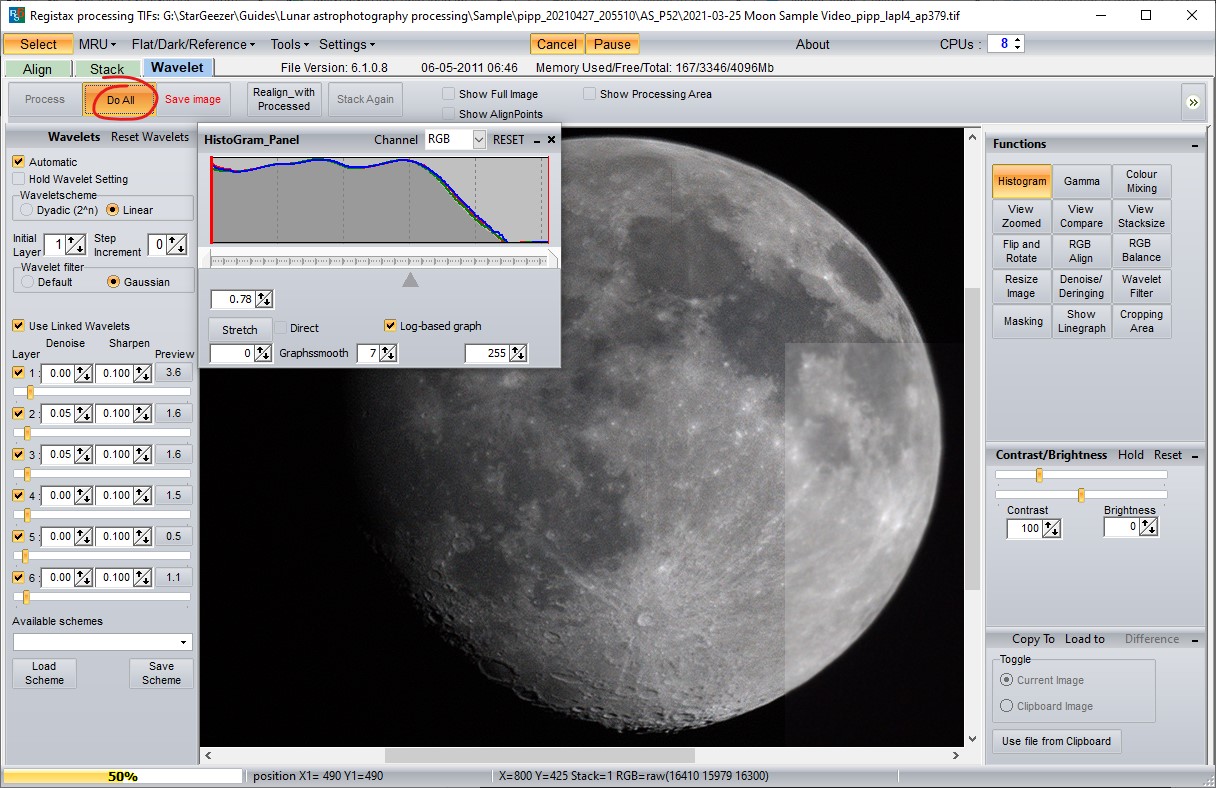
- Save your finished image in Registax
If you’re happy simply click “Save image” to save your masterpiece!
Below is an example from the processed data.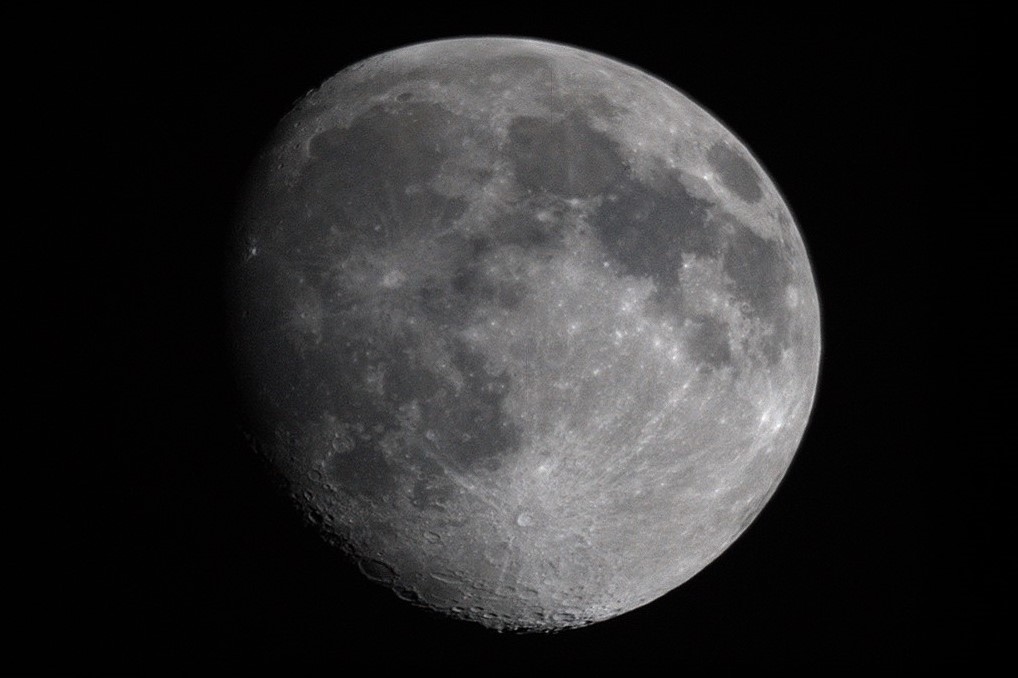
What next?
I hope that you found this guide helpful in getting you started with your astrophotography processing.
Please also take a look at my other beginner’s astronomy guides, follow my journey or join me on twitter.